Welcome to Screenshot Bro
Beautiful App Store and Google Play screenshots, made on Mac, iPad, and iPhone.
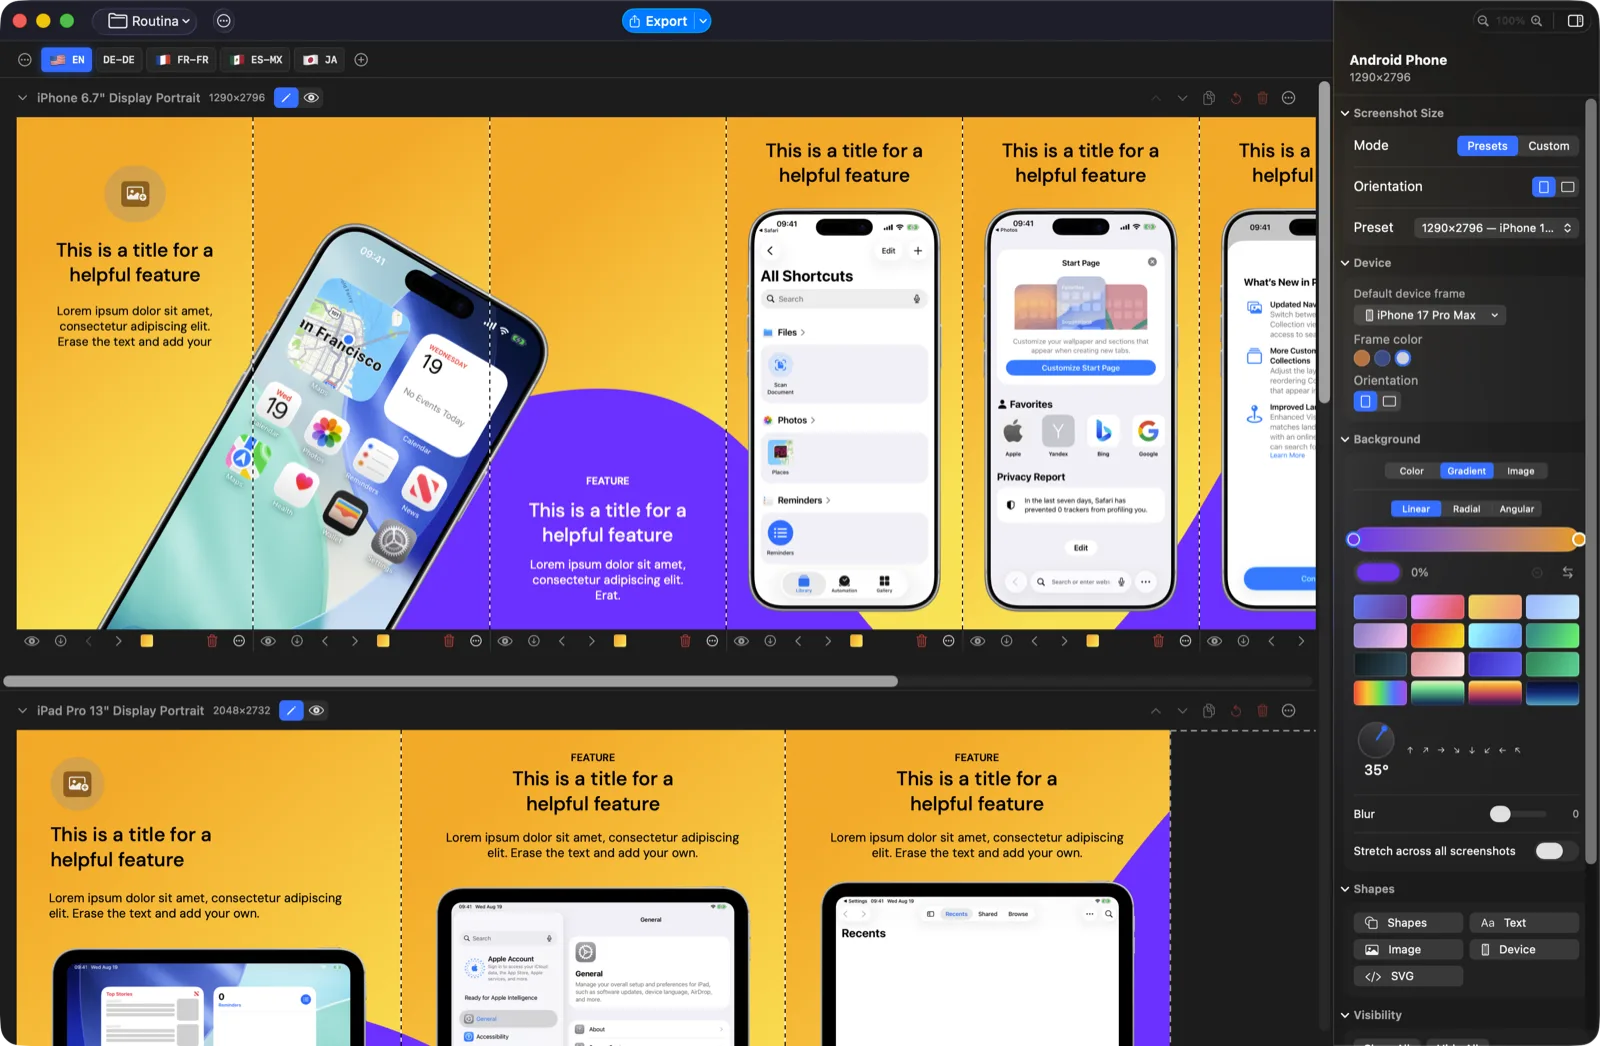
Screenshot Bro turns raw device screenshots into polished, store-ready marketing images. Drop in a screenshot, pick a device frame, add a headline, and export at exactly the resolution the App Store and Google Play expect.
Three things to know first
- Projects hold one screenshot set per app — usually one project per app, or one per major release.
- Rows inside a project group screenshots by device type (iPhone, iPad, Android phone, etc.). Each device size gets its own row because the App Store requires different resolutions.
- Templates are the columns inside a row — the individual screenshots you'll submit. Most apps need 3–10 templates per row.
A typical workflow
- Create a new project from a template, or start blank.
- Drop your raw device screenshots onto templates or rows — Screenshot Bro fills them in order and detects the device category and frame where possible.
- Pick a device frame, add a headline, choose a background, and arrange shapes.
- Add the languages you support — translate text once and let the layout follow.
- Export. You'll get a folder organized by language and device, ready to upload — or upload straight to App Store Connect or Google Play from inside the app.
New here? How to use Screenshot Bro walks that workflow step by step, with a screenshot of the app at each stage. This page is the reference behind it.
If this is your first time, an interactive tour walks you through the editor when your first project opens. To run it again later, use Settings ▸ General ▸ Editor tour ▸ Replay Tour.
Projects
One project per app — or per major release.
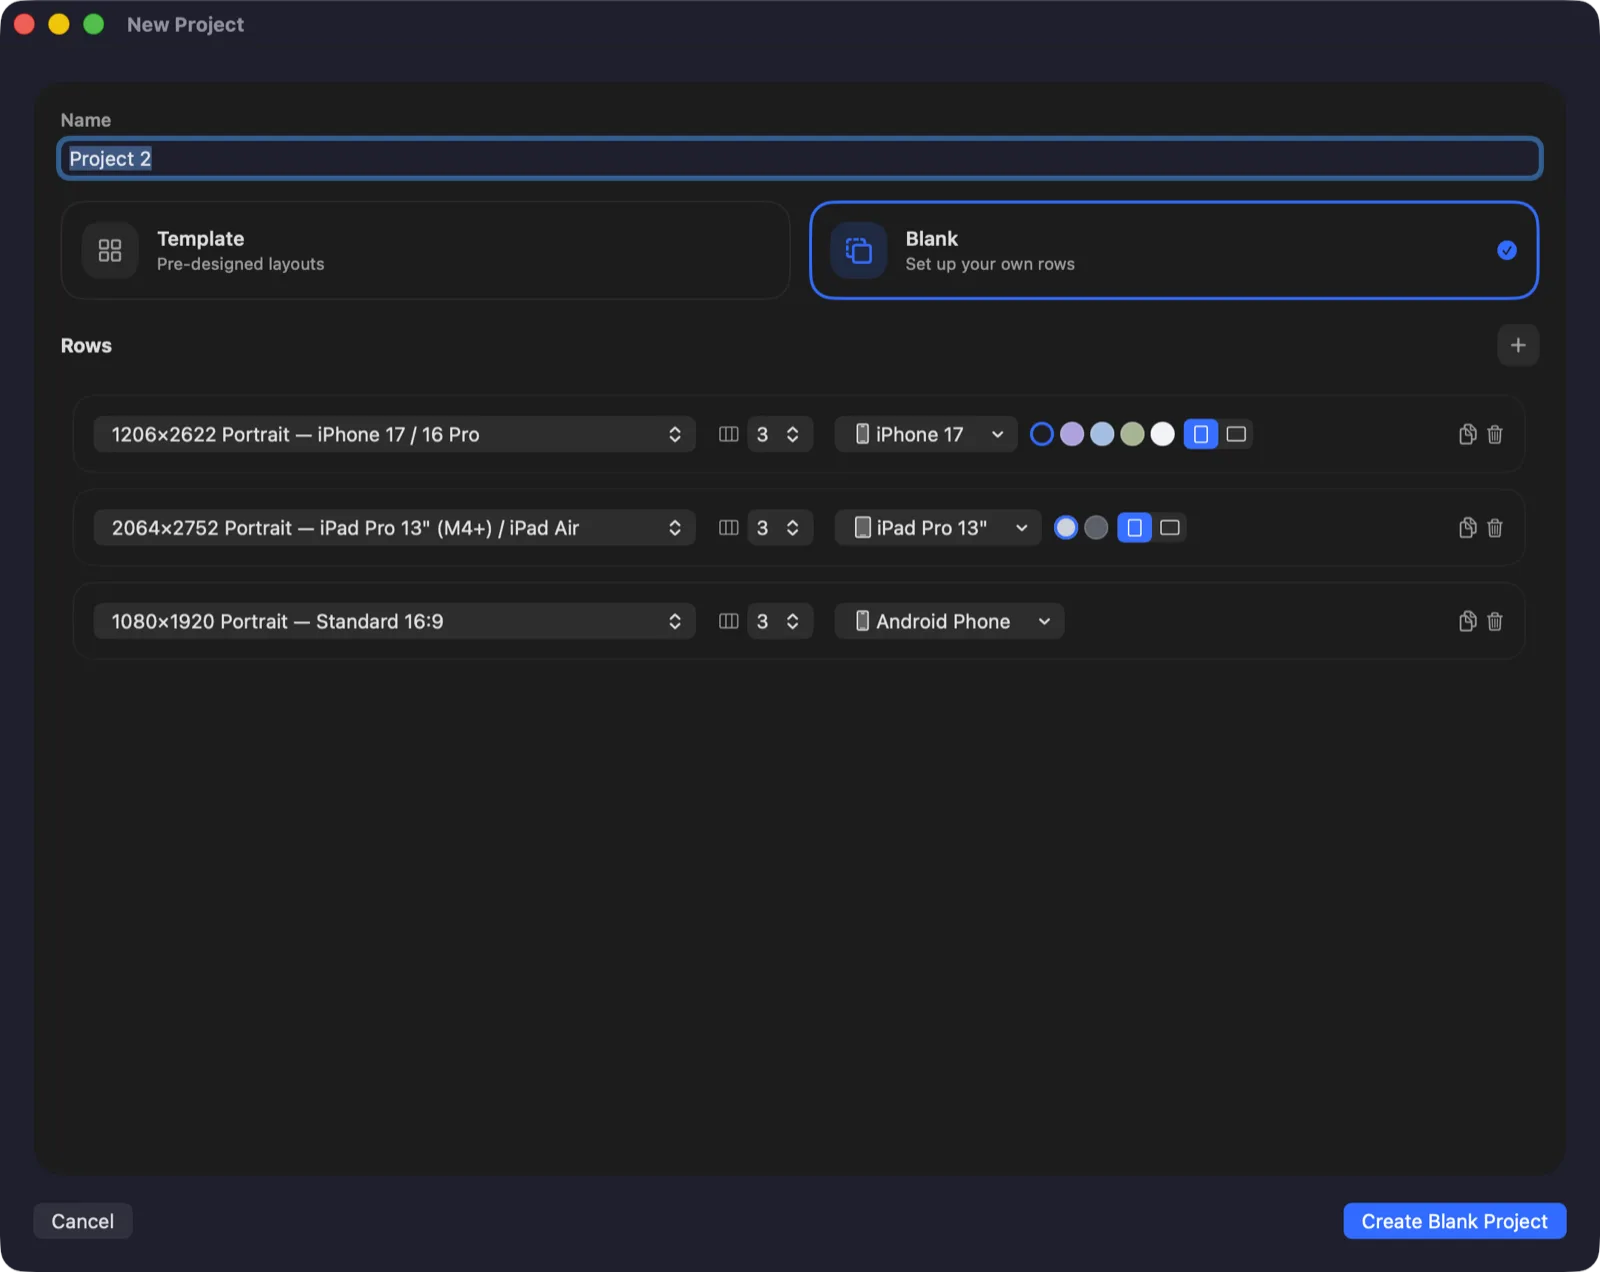
A project is a self-contained collection of rows, templates, shapes, languages, and image resources. Projects are stored on disk under your user Application Support folder and can be optionally synced via iCloud Drive.
Creating a project
- File ▸ New Project… (⌘N) opens the New Project window.
- Choose Blank to set up rows and screenshot sizes manually, or From Template to start with a pre-designed layout.
- In Blank mode, pick the device categories you want — each one becomes a row with the right default screenshot size for the App Store / Play Store.
Switching between projects
- Use the project picker in the toolbar to jump between projects.
- Starred projects float to the top of the picker. The rest follow the order set in Settings ▸ General.
- Project order can be set to By creation date or Alphabetically in Settings ▸ General.
Renaming, duplicating, deleting
- Right-click a project card on the Projects screen for Rename…, Star Project, Duplicate…, and Delete….
- The toolbar's ⋯ menu carries the same actions for the project you have open, plus Reset Project… (empties it) and Reset Project from Template ▸ … (replaces its contents with a starter theme).
- App Store ▸ Update Metadata… opens the App Store Connect wizard in metadata-only mode, so you can edit a version's store text without uploading a single screenshot.
- Deleted projects are kept as tombstones for 30 days so iCloud sync can resolve conflicts cleanly. After 30 days the tombstone (and all images) are purged.
Project File
- Show in Finder reveals the project's folder.
- Copy Project File Path copies the path of its
project.json— handy in a bug report. - Copy AI Localization Prompt copies a ready-made prompt describing every text shape in the project, to hand to an AI assistant when you would rather translate outside the app.
Where projects live on Mac
~/Library/Application Support/screenshot/projects.json— index of all projects.~/Library/Application Support/screenshot/projects/<uuid>/project.json— project data. See the Project File Schema for the full format.~/Library/Application Support/screenshot/projects/<uuid>/resources/— imported images, screenshots, and SVGs.
If your projects look like they vanished
- Project names live in the
projects.jsonindex. If it goes missing, Screenshot Bro rebuilds it by scanning the project folders, so your work comes back rather than appearing deleted. - A project last saved by an older version (before 4.9 on Mac, 4.10 on iPad and iPhone) has no copy of its name outside that index, so a rebuilt entry appears as Recovered Project. Rename it and the name sticks from then on.
- An index that exists but can't be read is moved aside to
projects.json.corruptrather than deleted, so nothing is lost. - With iCloud sync on, the rebuild is deliberately skipped — an iCloud index can read as missing while the container is still downloading, and rebuilding then would rename every project on every device. Screenshot Bro waits and picks up the real index instead, usually within a launch or two.
Projects autosave 0.3 seconds after the last change — you never need to save manually. To make a one-off backup, use Settings ▸ General ▸ Storage ▸ Create Backup….
Rows
One row per device type.
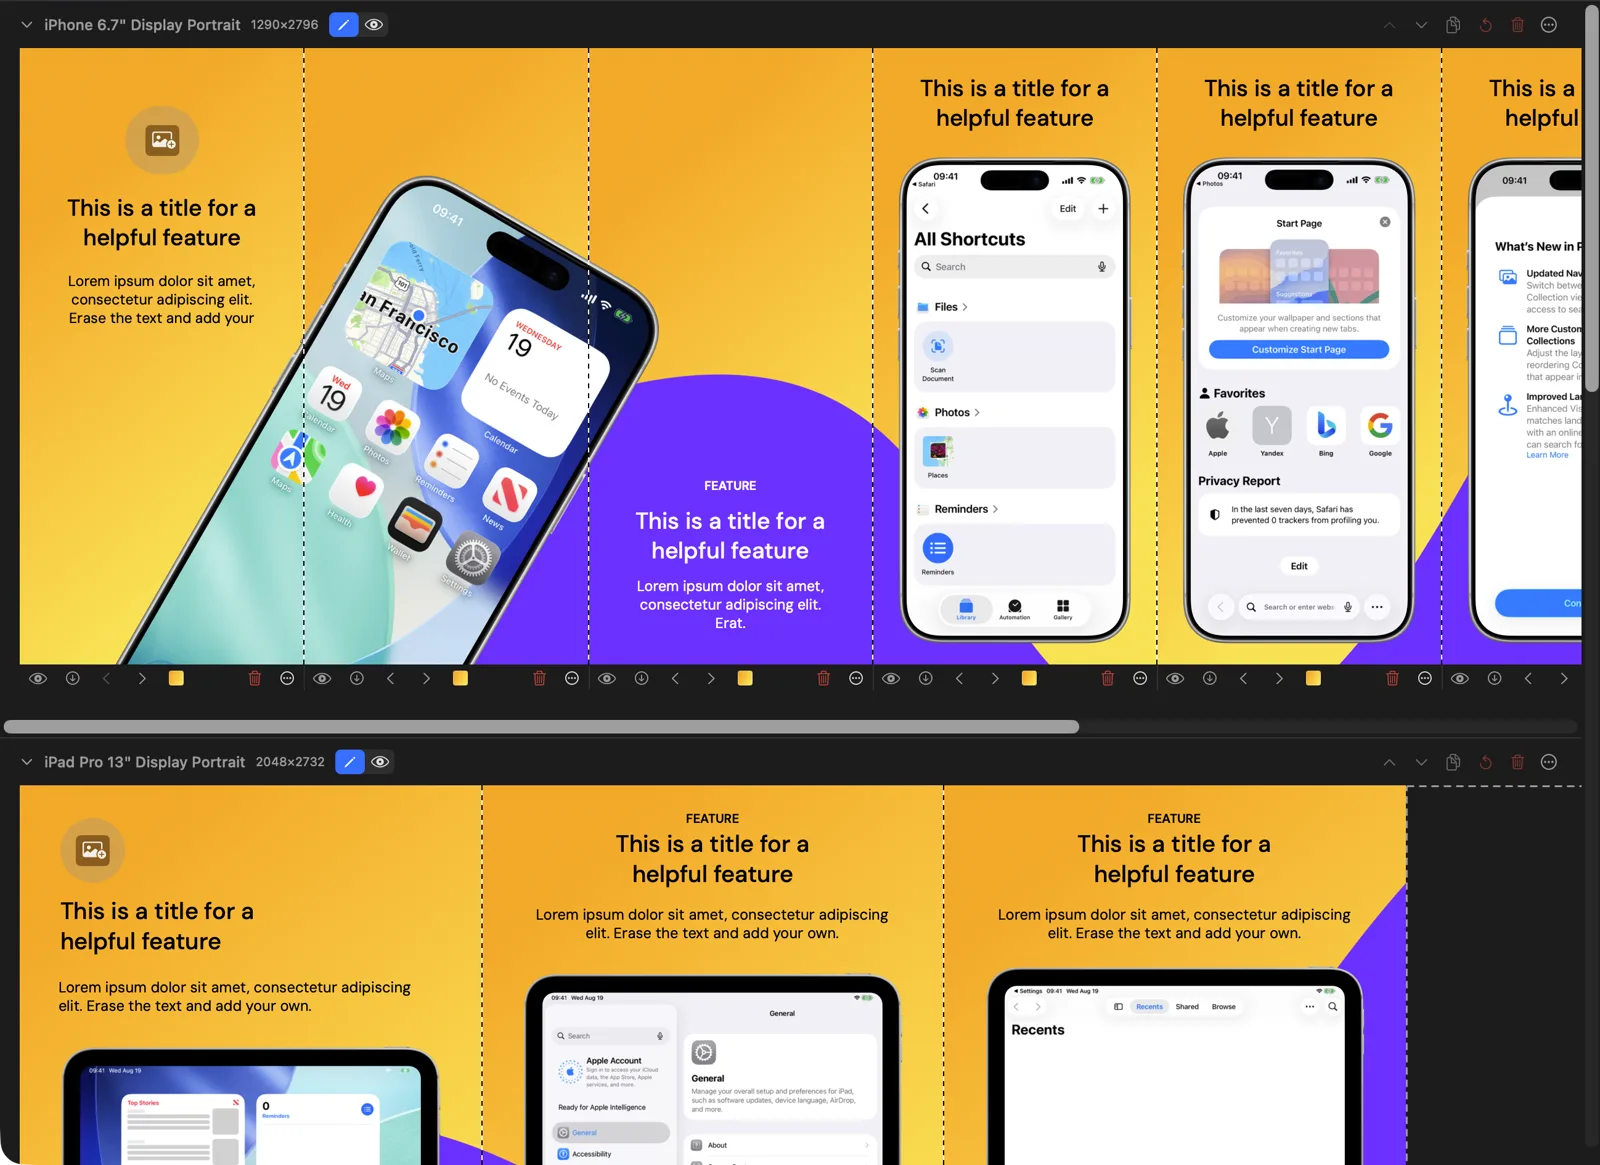
Rows are horizontal groups of screenshots inside a project. Each row has its own screenshot size (in pixels), device category, and a row-level background. The App Store requires separate uploads per device size — that's why rows exist.
Adding rows
- Click the dashed + tile at the bottom of the canvas (Add new row), or use the inspector when no row is selected.
- Choose a device category: iPhone, iPad Pro 11", iPad Pro 13", MacBook, Android Phone, Abstract Pixel 9, Android Tablet, or Invisible (an abstract layout with no visible frame).
- Each category sets the row's default screenshot pixel size to a value the relevant store accepts.
Row inspector
- Select a row (click empty canvas space inside it) to reveal row-level controls in the inspector.
- Row label — names the folder this row exports into. Double-click the label in the row header to rename it in place.
- Screenshot size — Presets lists the resolutions each store accepts, grouped by device. Switch to Custom to type any size from 100 to 5000 px.
- Orientation flips the row between portrait and landscape by swapping width and height.
- Background editor — color, gradient, or image, plus a Blur slider. See the Backgrounds section.
- Stretch across all screenshots — when on, the background spans the entire row width across all templates. When off, every template paints the same background independently. It needs at least two templates.
- Visibility — hide a whole shape type (all text, all devices, all SVGs…) in this row, with Show All / Hide All to flip every type at once. Hidden types are left out of the export too, not just the editor. Borders draws the divider lines between templates and is editor-only.
- Exclude when uploading to App Store Connect — keeps the row in your project and in folder exports, but leaves it out of an App Store Connect upload. Useful for an Android row, or a row you are still working on.
Collapse, edit, preview
- The chevron at the left of the row header collapses the row down to its header and expands it again. Collapsing is purely a view state — it changes nothing about the row and nothing about the export.
- The pencil / eye switch in the row header flips the row between editing and preview.
- Preview drops every handle, guide, and divider and lays the templates out as separate rounded tiles with a gap — the way a store listing shows them.
The row menu
- Add Screenshot and Add Element — add a template column or a shape without leaving the header.
- Duplicate Row, Add New Row Above / Below, Move Row Up / Down.
- Export Row — Screenshots, Continuous, or Showcase, for this row alone.
- Devices — show or hide all frames, Center All of them, Change All To another model in one step, or Reset All Images to clear their screenshots.
- Delete all removes every shape of one type. Reset Row empties the row; Delete Row removes it.
Reordering and deleting
- Reorder rows with Move up / Move down — the chevrons that appear when you hover a row header, or Move Row Up / Move Row Down in the row menu.
- ⌘D duplicates the selected row. Duplicate Row is in the row menu too.
- Delete rows from the row header or row menu. Settings ▸ General has a confirmation toggle.
On the Free tier a project holds up to 3 rows. Upgrading to Pro removes this limit — see Free vs Pro.
Templates
The individual screenshots inside a row.
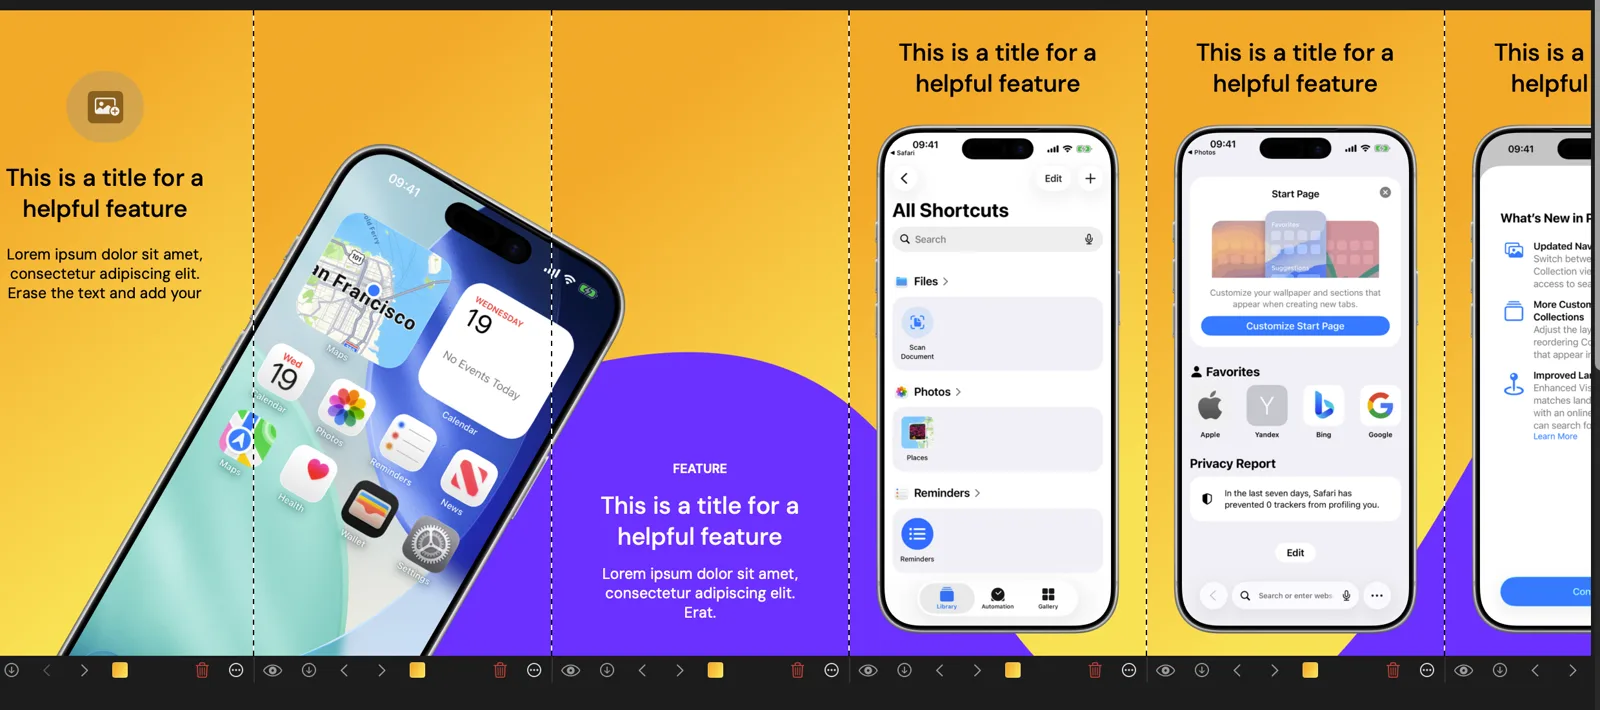
Each column inside a row is a template. A template is one final exported image — its dimensions match the row's screenshot size. The App Store accepts up to 10 templates per row; Google Play up to 8.
Adding templates
- Click the dashed + at the right end of the row (Add screenshot).
- New templates inherit the row's background and dimensions.
- Reorder with Move Left / Move Right in the template control bar (also in its ⋯ menu). The order decides the exported file numbering.
Per-template controls
- The Template Control Bar below each template lets you override the row background just for that template — including a Blur slider for gradient and image overrides.
- The bar shows as many buttons as fit. Zoom out or narrow the window and it drops the lower-priority ones, so a control can seem to disappear — the ⋯ menu is never dropped and always holds the full set.
- Drop a screenshot directly onto a template to attach it as the device screenshot.
- The ⋯ menu (More actions) offers per-template actions: Quick Look, Save as PNG…, Move Left / Move Right, Add Screenshot Before / After, Duplicate Screenshot ▸ Place After This One / Place at End, and Delete Screenshot.
How shapes relate to templates
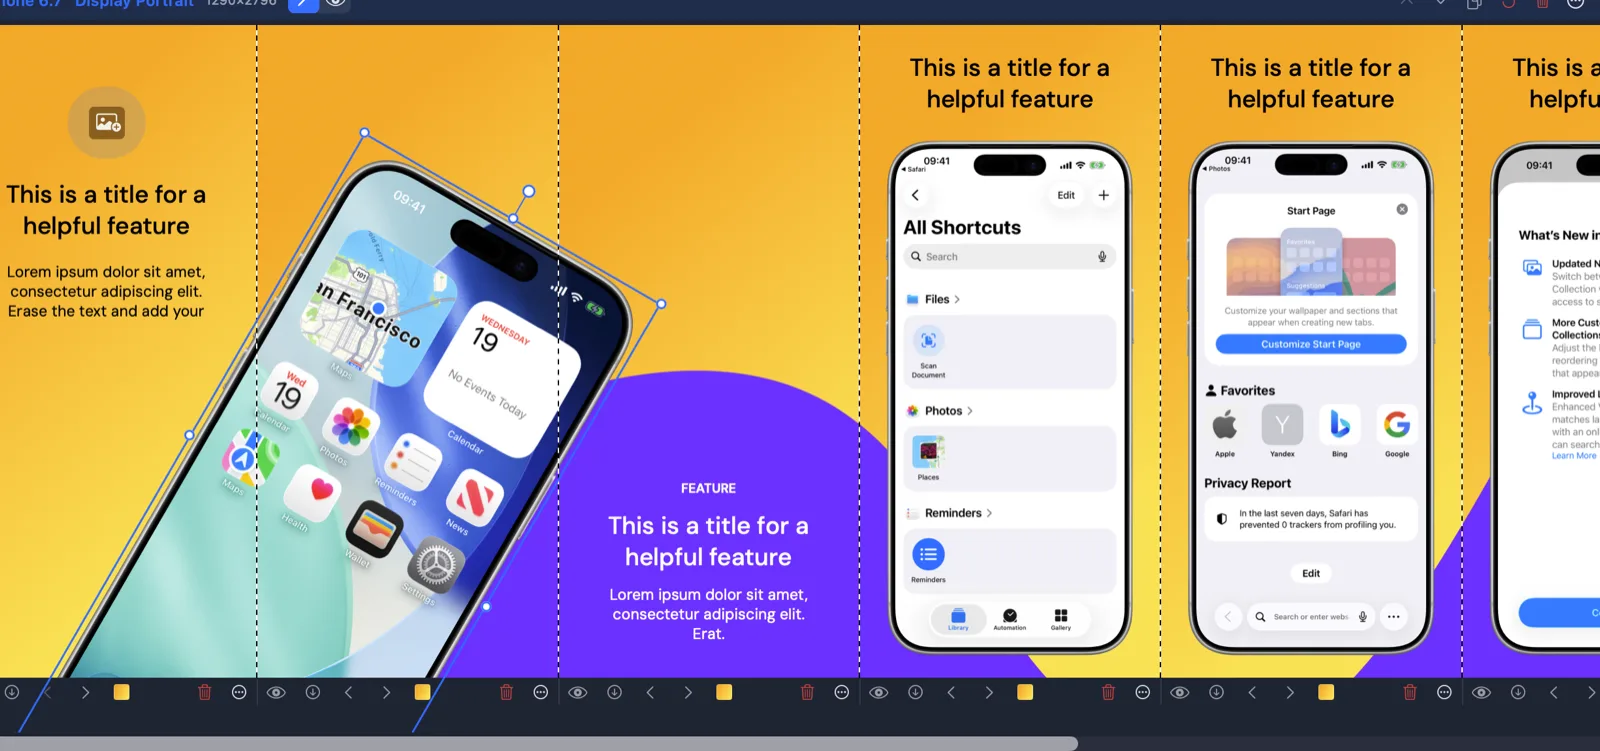
- Shapes (text, images, devices, etc.) live on the row canvas — the unified area behind all templates in a row. A shape can be positioned to land entirely inside one template, or to span across templates.
- On export, each template is clipped to its own bounds, so a shape that spans templates will appear on each of them at the right horizontal offset.
- This is what makes layouts like a single headline that flows across two screenshots possible.
Free tier limit: 5 templates per row. Pro removes this limit — see Free vs Pro.
Shapes & Text
Build the layout with rectangles, circles, stars, text, images, devices, and SVGs.
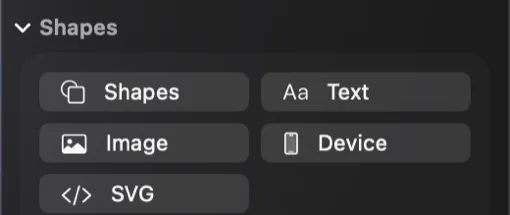
Most shape settings live in the properties bar along the bottom of the window. It appears only when at least one shape is selected on the canvas — selecting a row is not enough — and its controls change to match the kind of shape you picked.
Adding shapes
- Use the Shapes dropdown in the inspector to add a Rectangle, Circle, or Star.
- Buttons next to it add Text, Image, Device, or SVG elements.
- New shapes are placed at the center of the active template and immediately selected.
Text
- Double-click a text shape to edit inline. Press Esc or click outside to commit.
- With a text shape selected, the properties bar shows font, weight, size, color, horizontal and vertical alignment, line height, and letter spacing. An imported family offers only the weights and italics it actually ships.
- Italic and Uppercase toggle the whole shape. Uppercase is display-only — the text you typed is unchanged, so translations still read normally.
- Double-click the letter-spacing value to snap it back to the default.
- Rich text: while editing, select part of the text and use the format bar for bold, italic, underline, strikethrough, a different size, or a different color — per run, inside one shape. Clear formatting returns the selection to the shape's base style.
- Text background turns a headline into a badge: pick Solid, Pill, Outline, or Highlight, then tune color, padding, corner radius, opacity, and an outline.
- Copy Text Style / Paste Text Style (right-click) carry a text shape's whole look onto another one, or onto every selected text shape at once.
- Text auto-grows vertically by default. Drag a side handle to fix the width and let it wrap.
- Custom fonts: choose Pick custom font from the text font picker to import
.otf/.ttffiles.
Image
- Select the shape, then click the image well in the properties bar to pick a file, or drag and drop directly onto the shape.
- Fill modes: Fill (crop to fit), Fit (letterbox), Stretch (distort), Tile (repeat). Tile mode unlocks spacing, offset, and scale controls.
- Remove Background (right-click) cuts the subject out of the image, entirely on your Mac — nothing is uploaded anywhere.
- Restore Original Aspect Ratio (right-click) undoes stretching by fitting the height to the current width.
- Show in Finder (right-click an image, or a device that has a screenshot in it) reveals the picture file the project is using.
Device
- Device shapes render the screenshot inside a real device frame. Select one, then pick a category and model in the properties bar.
- Drop a screenshot onto the device to attach it. The image is automatically clipped to the screen area.
- Each model has color variants and (where applicable) a landscape variant.
- Match Size to Other Devices (right-click a single device) resizes the row's other devices of the same category to match this one. With several devices selected, the command becomes Match Size to Selected Devices and resizes just those.
- Invisible category shows the screenshot with no bezel — useful for clipped or abstract designs.
- On the abstract Android frames, a Camera toggle shows or hides the camera cutout.
SVG
- Click SVG to import a vector file, pick one of the bundled presets, or paste raw markup via the SVG paste dialog.
- SVGs render with a configurable color override and scale crisply at any export resolution.
- Replace SVG… (right-click, or in the properties bar) swaps in new artwork and keeps the shape's position, rotation, color, and effects. The frame narrows to fit the new artwork's proportions.
- During resize, rendering is debounced for performance — release the mouse to see the final crisp output.
Common properties
- X, Y, W, and H at the head of the properties bar set position and size by hand. X is measured from the left edge of the template the shape sits in. Every device except an invisible frame keeps its proportions, so typing a width adjusts the height to match.
- The Fill swatch opens the same editor a background uses, so a rectangle, circle, star, or text badge can take a gradient or an image, not just a flat color.
- Opacity, rotation (in degrees, editable as text), border radius, outline (color + width), and Clip to Frame (clips anything that overflows the template).
- Drop shadow — select a shape, then click Shadow in the properties bar and pick Soft, Medium, or Strong, or set color, blur, offset X, offset Y, and opacity by hand. Reset restores the defaults. It works on a multi-shape selection too.
- Lock — select a shape and choose Edit ▸ Lock (⌘L), or right-click it ▸ Lock. Clicks and drags then pass straight through it; a locked shape's only right-click item is Unlock.
- Z-order: ⌘⇧] brings forward, ⌘⇧[ sends back.
Editing several shapes at once
- Select more than one shape and the properties bar switches to a multi-selection bar showing how many are selected.
- When they are all the same kind it offers that kind's controls too, and applies each change to every shape: Change Device for devices, font / weight / alignment / Italic / Uppercase for text, corner radius, star points, SVG custom color, outline, shadow, opacity, rotation, and Clip to Frame.
- Z-order, duplicate, and delete act on the whole selection.
Devices & Frames
Real device frames with accurate screen insets.
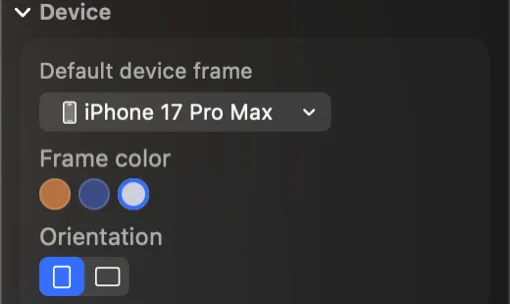
Device frames wrap your screenshot in an authentic device bezel. Screenshot Bro ships pixel-accurate frames for iPhone, iPad, Mac, Apple Watch, and Android-style layouts.
Frame families
The model picker groups frames into families, which are not the same list as the device categories you pick when adding a row. A Watch frame, for example, lives in the Watch family but sits in a row whose category is something else — so don't go looking for Watch in the Add Row list.
- iPhone — iPhone 18 Pro, iPhone 18 Pro Max, iPhone Duo, iPhone 17, iPhone Air, iPhone 17 Pro, and iPhone 17 Pro Max with their color variants, plus 3D iPhone options.
- iPad Pro 11" and iPad Pro 13" — current generation with portrait and landscape.
- Mac — MacBook Air 13", MacBook Pro 14", MacBook Pro 16", and iMac 24".
- Android Phone, Abstract Pixel 9, and Android Tablet — abstract frames that flex to match the aspect ratio of any dropped screenshot.
- Watch — Apple Watch Ultra 3 frame variants.
- Invisible — no visible bezel, just the screenshot. Useful for clipped layouts or abstract designs.
Picking a model and color
- With a device shape selected, click the device thumbnail in the properties bar to open the picker.
- Models are grouped by category. Each shows available colors as small swatches.
- Switching color preserves the screenshot and any rotation.
Landscape mode
- Concrete frames with portrait and landscape variants switch to the matching orientation when Screenshot Bro can infer it from a dropped screenshot.
- Use the orientation control for supported frames, or the rotation control to rotate the entire shape including frame and screen content.
3D device models (Beta)
- Models marked (3D) — iPhone 17 and iPhone 17 Pro Max — are rendered from real geometry rather than a flat bezel image.
- Their Appearance popover in the properties bar adds Pitch and Yaw rotation, a Matte or Glossy finish, and Ambient / Key / Rim lighting.
- Reset all returns rotation, material, and lighting to their defaults.
Image-based vs programmatic frames
- Most modern devices use image-based frames — high-res PNG bezels with precise screen insets defined per model.
- Some abstract categories use programmatic frames rendered as SwiftUI shapes. They scale flawlessly to any resolution.
- Both render identically in the editor preview and in the exported PNG.
If you drop a screenshot onto an empty template (not a device shape), Screenshot Bro creates a device shape automatically using the row's category and the right model based on the screenshot's pixel size.
Backgrounds
Color, gradient, or image — at row or template level.
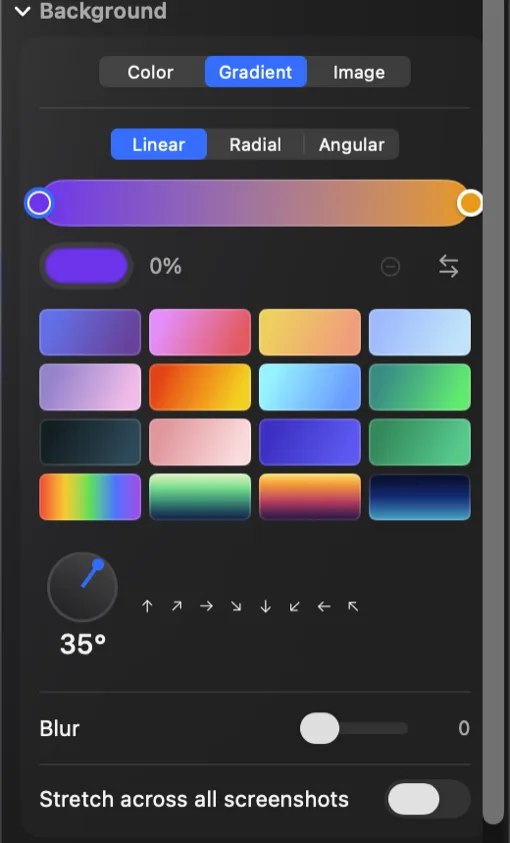
Three styles
- Color — a solid fill picked from the inline color picker.
- Gradient — Linear, Radial, or Angular. Edit color stops, angle, and (for Radial / Angular) the center point.
- Image — bring in any PNG / JPEG / SVG. Pick a fill mode and tweak opacity.
Gradients
- Linear: set the direction with the angle wheel, or with the eight one-click angle presets next to it.
- Editing stops: click anywhere on the gradient bar to insert a stop in the color it already shows there, drag stops to move them, click one to change its color, and remove it with the − button or the Delete key. Two stops is the minimum.
- Reverse gradient flips the stop order in one click.
- Radial: a circular gradient with an editable center point and an end radius derived from the canvas size.
- Angular: a sweep gradient rotating around the center.
- Gradient presets: pick from the gallery of 16 presets to apply tested stop combinations.
Image fill modes
- Fill — scales to cover; crops anything that doesn't fit.
- Fit — scales so the whole image is visible; leaves transparent letterbox bars.
- Stretch — fills exactly, distorting aspect if needed.
- Tile — repeats the image, with spacing, offset, and scale adjustable independently for the horizontal and vertical axes.
Row vs template backgrounds
- By default a row's background applies to every template in the row.
- Stretch across all screenshots (row toggle): when on, gradients and images render once across the entire row, so a single horizon or gradient flows across all templates.
- Override per template: from the template control bar, set a unique background that replaces the row's default just for that template.
Spanning is great for storytelling: a sunset gradient or a single panoramic image can stretch across three templates and tell a continuous visual story in the App Store carousel.
Editing on the Canvas
Drag, resize, rotate, snap.
Selection
- Click a shape to select it. Shift-click to add to or remove from the selection.
- Drag from empty canvas to sweep a selection box over several shapes at once. Hold ⇧ as you start the drag to add them to the current selection. Locked shapes are skipped.
- ⌘A selects every shape in the active row.
- Esc deselects shapes; press again to deselect the row.
- Click empty canvas inside a row to select the row itself and reveal row-level inspector controls.
- While a non-base language is active, an amber border frames the whole editor so an override is never made by accident.
Move, resize, rotate
- Drag the shape body to move. Drag a corner or edge handle to resize.
- Drag the rotation handle (above the shape) to rotate freely, or hold ⇧ while dragging it to snap to 15° steps. Type a degree value into the rotation field for exact control.
- Hold ⇧ while resizing to lock aspect ratio. Device frames other than Invisible always keep their proportions, with or without ⇧.
- Hold ⌥ while dragging to duplicate the shape as you move.
Snapping & alignment guides
- Shapes snap to other shapes' edges and centers, and to template boundaries, within a 4px threshold.
- Blue alignment guides appear while dragging to show which edges are aligned.
Align, distribute, match
- Right-click a multi-shape selection ▸ Align Selected for left / center / right, top / middle / bottom, plus Distribute Horizontally and Distribute Vertically.
- Match to This copies the shape you right-clicked — its Position, its Size, or both — onto the rest of the selection.
- Center places a shape vertically, horizontally, or at the exact center of its screenshot.
- Duplicate ▸ To All Screenshots on the Left / Right / All copies a shape into the other templates in the row at the same relative spot — the quickest way to repeat a logo or a footer.
Locking
- Edit ▸ Lock (⌘L) locks or unlocks the selection; Lock is on the right-click menu too. Locked shapes can't be dragged, resized, or deleted, and clicks fall through to whatever is behind them.
- Right-click a locked shape and choose Unlock to get it back.
Double-click
- Double-click a text shape to edit it in place.
- Double-click a device or image shape to open the picker and swap its picture.
Copy and paste
- ⌘V pastes at the pointer — an image from the system clipboard becomes a new image shape where the mouse is, and shapes copied inside the app land there too, carrying their translations and images with them.
Nudge
- Arrow keys nudge the selection by 1px.
- ⇧ + Arrow nudges by 10px.
Pan & zoom
- Scroll vertically to navigate rows. Hold the middle mouse button and drag to pan.
- ⌘+ / ⌘− zoom in/out, ⌘0 resets to the default zoom, F focuses on the current selection. Trackpad pinch and ⌘ + Scroll also zoom.
- The toolbar zoom control ranges from 25% to 300% in 25% steps, with Fit to Editor and Actual Size actions in its popover.
If a shape spans across templates and you only see part of it, that's expected — each template clips shapes to its own bounds. Use F to focus on the whole shape.
Languages & Translations
Translate text once, lay it out once, ship every language.
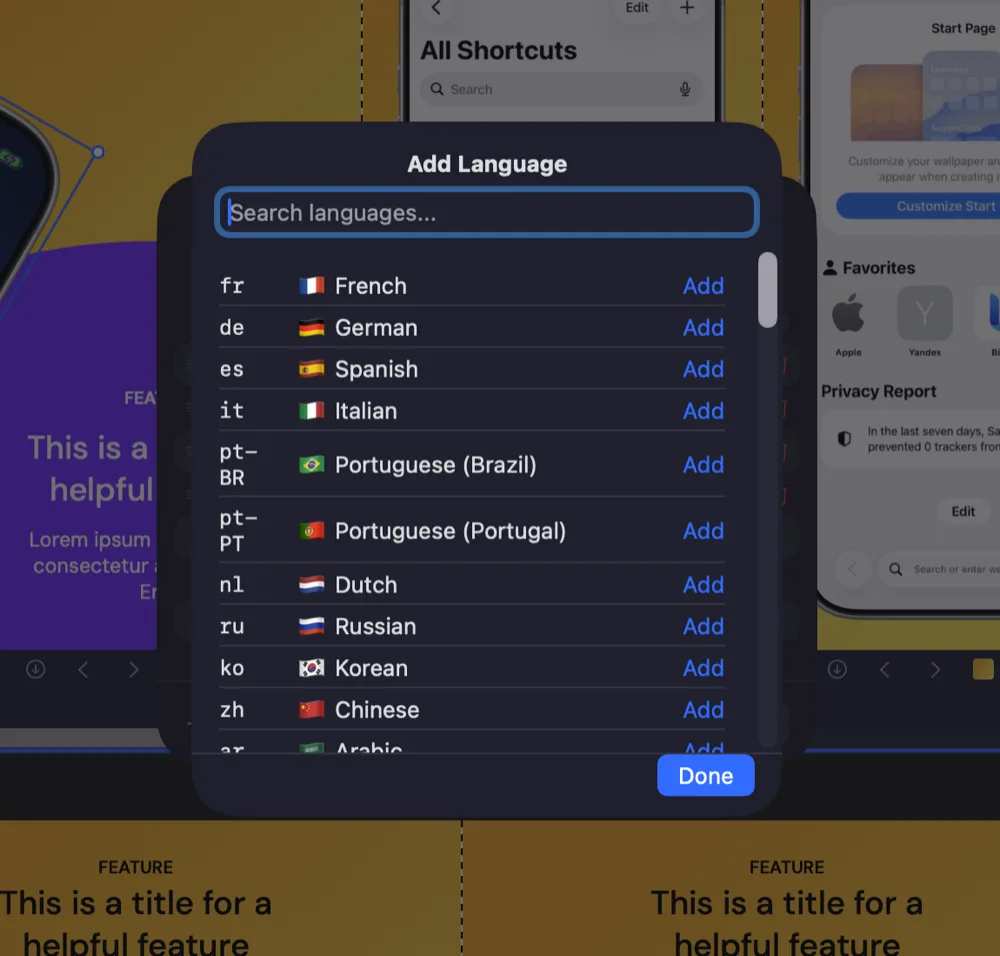
Languages let you generate localized screenshot sets without duplicating your project. Each language shares the same shape set and can keep its own text, text styling, image assignments, and layout adjustments where a translation needs more space.
Adding languages
- Open the Language menu in the toolbar, or the top-level Language menu in the menu bar — which also lists every language you've added, so you can jump straight to one.
- Manage Languages… opens the full list, with a translated/total badge per language: green when complete, orange when something is still missing.
- Pick from the 81 built-in language presets, or define a custom code.
- The first language you add is the base language — the one whose text is the source of truth.
- You can change which language is the base. In Manage Languages, drag a language to the top of the list, or right-click it and choose Set as Base. Every other language is re-anchored to it.
Switching the active language
- ⌘] / ⌘[ cycle forward / backward through languages.
- ⌘⌥0 jumps back to the base language.
- When editing a non-base language, a banner appears at the top of the canvas reminding you which language you're in.
How translations work
- In a non-base language, edits are saved as per-language overrides — they don't change the base language.
- Text content and styling, image replacements, and position/size adjustments can all differ by language. Shared properties such as colors and device choices are edited in the base language.
- If a language has no override for a shape, it falls back to the base language's content.
Translation helpers
- Auto-Translate Missing Text — fills in text shapes that don't yet have an override for the current language.
- Re-Translate All Text… — replaces every existing override with a fresh translation. Use after editing the base language's text.
- Translate Selected to All Languages — appears in the language bar when editing the base language with text shapes selected. Translates the selection into every other language at once.
- Revert to Base Language… — drops all overrides for the current language, falling back to base text everywhere.
- Edit Translation Table… — a side-by-side editor showing every text shape with its base content and per-language overrides. Hover a cell for per-cell Translate and Reset actions.
- A translation that carries rich formatting shows in that table as read-only, marked *Formatted — edit on the canvas*. Mixed bold, colors, or sizes can't survive a plain text field, so edit those on the canvas instead.
- With a text shape selected, the globe button in the properties bar shows the base text and one editable row per language, plus Translate into All Languages, a per-language reset, and Reset All Translations.
- Reuse Translation (right-click a text shape) links it to another string, so both share one base text and one set of translations. A headline repeated across templates is then translated once.
- Right-click ▸ Localization translates just that shape into the current language or into all of them, or resets its translations.
Exporting with languages
- On export, Screenshot Bro creates one folder per language, then sub-folders per row. The structure matches what App Store Connect's localized screenshot uploads expect.
Importing
Drop screenshots, images, fonts, and SVGs.
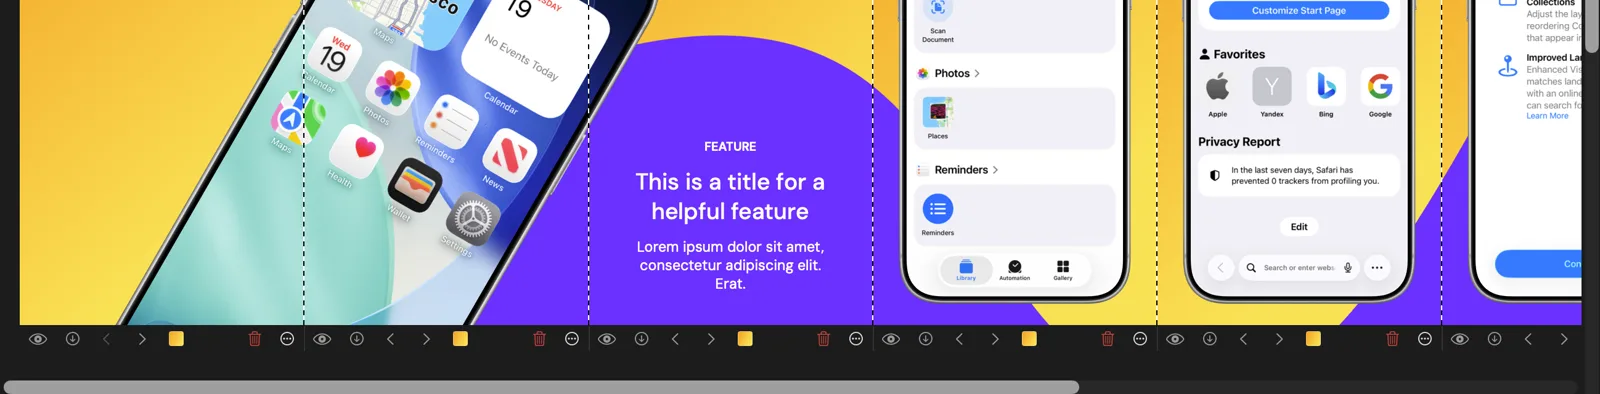
Screenshots
- Drag and drop a PNG / JPEG onto a template to attach it as a device screenshot. A device shape is auto-created if needed.
- If a drop can't be read — a corrupt image, or SVG markup Screenshot Bro can't parse — it says so instead of silently doing nothing.
- Batch import: drop multiple screenshots onto a row. Screenshot Bro fills existing device shapes in template order, then appends templates as needed.
- Recognized screenshot dimensions are used to pick an appropriate device category or frame when possible.
Background images
- Drop directly into the background image well in the inspector, or pick via the file dialog.
- Both raster and SVG images are supported as backgrounds.
SVG paste
- Use the SVG button in the shape toolbar to open the paste dialog.
- Paste SVG markup directly. Width and height are auto-detected; you can override them.
- SVGs are sanitized — script and event handlers are stripped before rendering.
- Drop several SVGs at once and they cascade slightly apart instead of stacking on one spot.
Custom fonts
- Open a text shape's font picker and choose Pick custom font to import
.otf/.ttffiles or a folder of font variants. - Imported fonts are bundled with the project so they survive iCloud sync and project transfer.
Dropping a folder or a group of image files onto a row is the fastest way to fill a screenshot set in order.
Exporting
Produce store-ready PNGs and JPEGs.
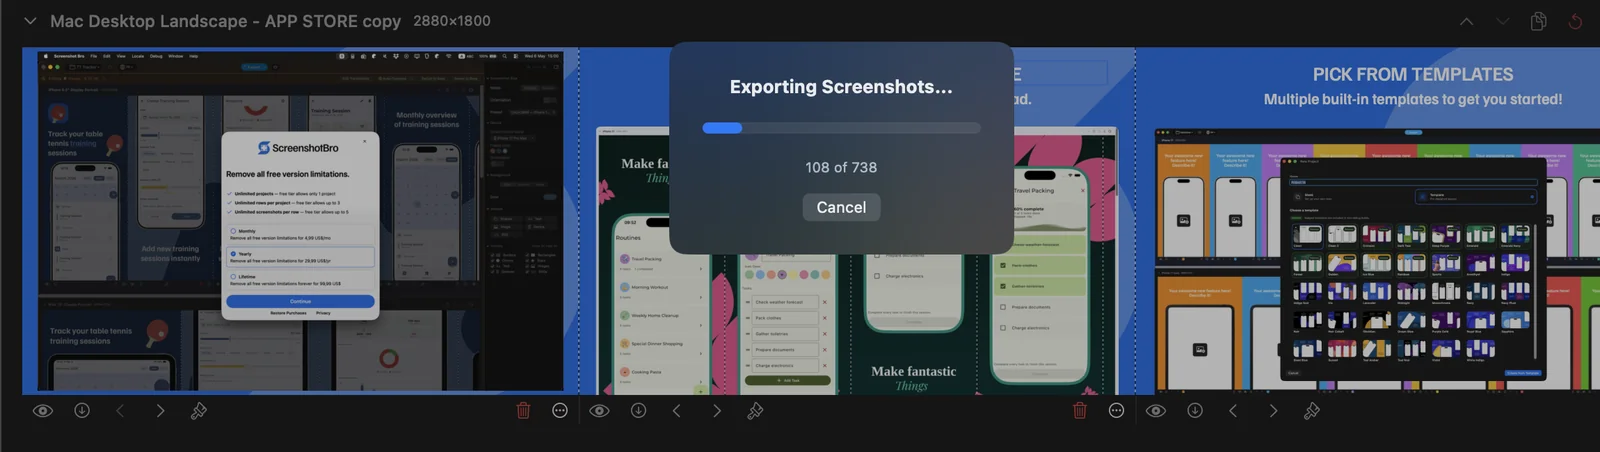
Quick export
- Click Export in the toolbar, or press ⌘E, to render the current project to the remembered export folder. If no folder is set, Screenshot Bro asks you to choose one.
- Use the export menu for Export All Screenshots to Folder…, row exports, Export Locale for a single language, Open Export Folder, and direct upload to App Store Connect or Google Play.
- A long export shows a progress overlay you can cancel — nothing half-written is left behind.
- File names are zero-padded (
01_…,02_…) so they sort correctly when uploaded.
Three ways to render a row
- Screenshots — one image per template. This is what the stores want.
- Continuous — the whole row as one wide image, templates side by side.
- Showcase — a marketing composition of the row on a styled background. See Showcase Export.
- All three are in the export menu (for every row) and in a row's Export Row menu (for that row alone).
What actually gets exported
- Only what you see. Shape types switched off in the inspector's Visibility section are left out of the exported image too.
- Template borders, alignment guides, and selection handles are editor-only and never exported.
- If an image file a screenshot needs can't be read, the frame renders empty and the export ends with Some Images Are Missing rather than a plain success — a blank device frame otherwise passes every check right up to the store.
Format and naming
- Settings ▸ Export ▸ Format: PNG or JPEG. PNG is recommended for marketing screenshots.
- Custom filename suffix: add a suffix to every exported screenshot filename.
- Exports use the row's exact pixel dimensions so App Store and Google Play sizes stay correct.
Folder structure
- With one language and one row: a flat folder of templates.
- With multiple languages: a top-level folder per language.
- With multiple rows: a sub-folder per row label (e.g.
iPhone 6.9",iPad 13").
Export folder memory
- Set Settings ▸ Export ▸ Export folder to make ⌘E export directly without prompting.
- Toggle Reveal in Finder after export in Settings to auto-reveal the result.
Preview vs export
- The pencil / eye switch in a row header lays the row out as a store-style carousel with no editing chrome — the fastest check that a set reads well together.
- Use the Quick Look button in the template control bar to preview fully rendered screenshots without going through the export flow.
Showcase Export
Turn a row of screenshots into one marketing image.
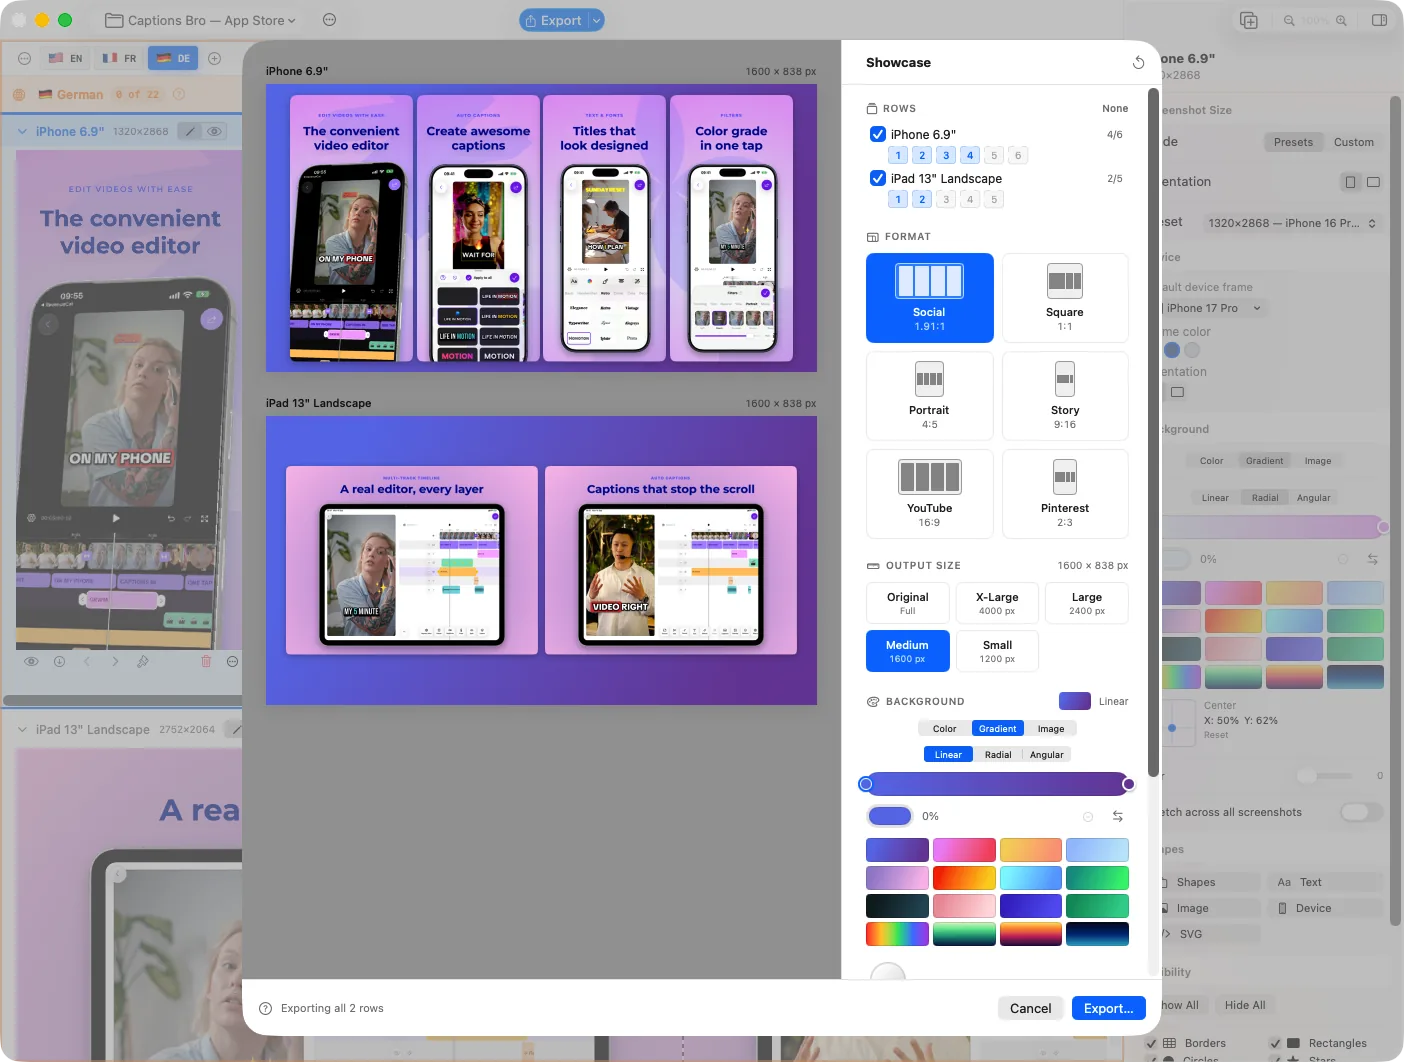
A showcase arranges a row's screenshots side by side on a styled background and renders them as a single image — for a product page, a launch post, a README, or an ad. It doesn't replace store screenshots; it's the picture you post *about* them.
Opening it
- Export menu ▸ Export Rows ▸ Showcase for the whole project, or a row menu ▸ Export Row ▸ Showcase for one row.
- The sheet previews the result live as you change settings.
- Pick which rows to include (with All / None), then use the numbered chips to drop individual screenshots from the composition — the counter shows how many of the row's screenshots are in.
- Reset to defaults restores the layout settings and leaves your row selection alone.
Shape and size
- Aspect ratio presets: Social (1.91:1), Square, Portrait (4:5), Story (9:16), YouTube (16:9), and Pinterest (2:3).
- Output size: Original, X-Large (4000 px), Large (2400 px), Medium (1600 px), or Small (1200 px) on the longest edge.
- Spacing, Padding, and Corner radius are percentages of the canvas, so a layout keeps its proportions at every output size.
Background
- The same editor as a row background: color, gradient, or image, with every fill mode. See Backgrounds.
Export the same row twice — once as Story for a 9:16 post and once as Social for the link preview. The layout adapts to each aspect ratio instead of being cropped.
App Store Connect
Upload screenshots straight from Screenshot Bro.
Connect your App Store Connect API key once and Screenshot Bro can upload exported screenshots to a specific app version without leaving the app.
Set up an API key
- Go to App Store Connect ▸ Users and Access ▸ Integrations ▸ App Store Connect API.
- Create a key with permission to edit app metadata — Account Holder, Admin, or App Manager roles are typical. Download the
.p8private key file (you can only download it once). - Note the Issuer ID and Key ID.
- In Screenshot Bro: Settings ▸ App Store Connect, paste the Issuer ID and Key ID, import the
.p8file, then run Test Connection. The key is stored in your Mac's Keychain.
Uploading screenshots
- Click Upload to App Store Connect… in the export menu. Screenshot Bro renders the selected screenshots directly from the project.
- If every version of the app is live or locked for review, the version step offers Create Version — it prefills the next number for each platform the app ships on, and you can edit it before creating.
- Pick the app and a version, then choose which rows go to which display type and locale. The display type is auto-detected from the row's pixel size — Use detected accepts the suggestion, and a warning appears if a row looks like an Android size.
- Each row has an include toggle, so you can leave one out for this upload only. To exclude a row from *every* upload, use the inspector's Exclude when uploading to App Store Connect instead.
- If a language has no matching App Store locale, the wizard says so and offers Create de-DE in App Store Connect — naming the App Store locale code it would add — right on the row. One click adds it to that version and the row switches to it. Languages the App Store doesn't offer, and versions Apple has locked for editing, still have to be handled on the website; Refresh App Store data picks up anything added there.
- Review Changes lists, per locale and display type, exactly what will be added, what will be replaced, and what stays untouched. Nothing is sent to Apple until you confirm there.
- Sets are grouped by version and device — open a locale to compare the current App Store screenshots with the proposed ones. Locales that already match are hidden behind Show unchanged, and Select All Changed / Deselect All set what gets synced.
- Upload skips that screen and compares against the store as it goes, uploading only what differs and keeping the App Store asset IDs of exact matches. The progress bar counts the screenshots as they render, then compares each set.
- Replace All Screenshots, offered next to Upload when you confirm, skips the comparison entirely: everything currently in the selected sets is deleted and every screenshot is uploaded again with new asset IDs. It prepares faster and uploads slower, so it pays off when most screenshots changed and costs you when only one did.
- If an upload stops partway — a dropped connection, or App Store Connect rate limiting a large sync — just run it again. Locales that finished are remembered and skipped, and screenshots already delivered are matched by checksum rather than uploaded twice.
Editing store metadata
- The same wizard edits the version's text, locale by locale, with a live character counter against Apple's limits.
- App Info (shared across versions): App Name, Subtitle, Privacy Policy URL.
- This Version: What's New, Promotional Text, Description, Keywords, Support URL, and the Copyright line (which applies to every locale at once).
- Copy to all locales fills every other language's *What's New* from the one you just wrote — useful before you translate it properly.
Demo mode
- Settings ▸ App Store Connect ▸ Demo mode walks the whole flow against sample data — no API key needed, and nothing is ever sent to Apple.
- While demo mode is on, the real API key above it is ignored.
App Store Connect accepts 1–10 screenshots per display type and locale — one is enough to submit, though most apps use three or more. Screenshot Bro respects template ordering when uploading.
Google Play
Upload store listing screenshots to Google Play.
Connect a Google Play service account once and Screenshot Bro can upload exported screenshots to your app's store listing without leaving the app.
Set up a service account
- In the Google Cloud console, create a service account and enable the Google Play Android Developer API.
- Create a JSON key for that service account and download it — this is the file Screenshot Bro imports.
- In the Play Console ▸ Users and permissions, invite the service account's email and grant it access to edit your app's store listing.
- In Screenshot Bro: Settings ▸ Google Play, click Import .json File…, then run Test Connection. The key is stored in your Mac's Keychain.
Uploading
- Choose Upload to Google Play… from the export menu. Screenshot Bro renders the selected screenshots directly from the project.
- Enter your app's package name (for example
com.example.myapp), then review which screenshots go to which language before confirming. - The upload is staged as a Play edit and committed when you confirm. Google Play accepts at most 8 screenshots per type.
- Send changes to review decides what happens on commit: leave it off and the changes wait as a draft in the Play Console; turn it on and they go straight into review. If you expect to check the listing before it ships, leave it off.
Demo mode
- Settings ▸ Google Play ▸ Demo mode runs a simulated upload — no service account required and nothing is ever sent to Google Play.
- Use it to walk through the whole upload flow before you have credentials set up. While demo mode is on, the imported service account is ignored.
Google Play enforces stricter screenshot aspect-ratio and dimension limits than the App Store. The default 1242×2688 iPhone size is too tall for Play — if an upload is rejected, switch the row to a screenshot-size preset Play accepts.
iCloud Sync
Edit on one Mac, continue on another.
iCloud sync keeps your project library in iCloud Drive (iCloud.xyz.tleskiv.screenshot). Changes made on one Mac propagate to others signed into the same iCloud account.
Enabling
- Settings ▸ General ▸ iCloud Sync — toggle on.
- First-time enable migrates your local project library into iCloud. A progress indicator shows the migration.
- Disabling does not delete your iCloud data — your projects remain in the iCloud container until you delete them manually.
How conflicts are resolved
- Each project is merged using a last-writer-wins strategy at the field level. The most recently edited shape, row, or background wins.
- Deletions are tracked as tombstones for 30 days, so a delete on Mac A correctly propagates to Mac B even if the device is offline at the moment of deletion.
- File coordination prevents corruption from concurrent reads/writes.
Knowing what's syncing
- The Projects screen shows sync progress while iCloud is uploading or downloading.
Screenshots that aren't there yet
- A project's text and layout sync in one small file, so a project can open before its screenshots have finished downloading.
- A device frame with a download badge is waiting for iCloud. Screenshot Bro asks for those files first and fills them in as they land — no need to reopen the project.
- A device frame with an orange warning triangle means the image file itself is gone. Add the image again to restore it; the layout, text and translations around it are untouched.
If sync seems stuck, open Finder ▸ iCloud Drive ▸ Screenshot Bro and check whether files are still uploading. Toggling iCloud off and on again forces a re-scan.
Automation & MCP
Let an AI assistant build screenshots for you.
Screenshot Bro can host a local MCP server — a small server running only on your Mac that AI assistants and MCP clients (such as Claude Code, Claude Desktop, or Cursor) connect to. Once connected, the assistant can create and edit projects, arrange shapes, translate text, and export screenshots on your behalf, driving the app while you watch.
Turning it on
- Settings ▸ Automation ▸ Enable MCP server. It's off by default.
- The server runs on
127.0.0.1(loopback only) — it is not reachable from other computers or the internet. - Once enabled it stays on and starts automatically the next time you launch. The app has to be running for a client to connect.
Connecting an assistant
- The easiest way: click Copy Agent Prompt and paste it into your AI assistant. It contains everything the assistant needs to add the server itself, then reconnect.
- Prefer to configure by hand? Use Copy Configuration (JSON) for a standard
mcpServersentry, or copy the Server URL and Access Token individually and add them in your client. - The Status row shows whether the server is running and on which port.
What the assistant can do
- Create projects (including from bundled templates), rename, delete, and switch between them.
- Add, edit, move, and remove rows, template columns, and shapes.
- Import screenshots into device frames, add and translate languages, and set per-language text.
- Render a preview so it can actually see the current canvas, and export the finished screenshots.
- Read and rewrite your App Store Connect descriptions, and preview then apply a screenshot sync to a version.
- Everything goes through the same actions you use by hand — so the assistant's changes are undoable with ⌘Z and autosaved like any other edit.
Security & the access token
- The server requires an access token: every request must present it, so another app on your Mac can't quietly drive Screenshot Bro.
- Keep the token private — anyone who has it can control the app while the server is running.
- Regenerate Access Token issues a fresh token and restarts the server; any client using the old token must be updated.
For a full walkthrough — connecting Claude Code, Claude Desktop or Cursor, what each of the 26 tools does, the prompts that work, and how to feed it your own screenshots — see the Screenshot Bro MCP guide.
If the server won't start, something else is usually holding its port — quit that program, then switch the server off and on again. Turning it off releases the port immediately.
Settings & Defaults
Tune the app to match your workflow.
General
- Appearance — Auto / Light / Dark.
- Language — override the app interface language. Requires a relaunch.
- Picking a right-to-left language such as Persian mirrors the toolbars, menus, and inspector, as it should. The canvas is never mirrored — shape positions are stored in model space and must render identically for everyone, so your screenshots look the same whatever language you edit in.
- Default screenshot size — used when creating new rows.
- Default device frame — pre-selects a device category and model for new rows.
- Screenshots per new row — number of empty templates a new row starts with.
- Default zoom — initial zoom level when opening the app.
- Ask before deleting rows and screenshots — show a confirmation prompt for destructive row and screenshot actions.
- Project order — By creation date or Alphabetically.
- iCloud sync — toggle and check status.
- Editor tour — Replay Tour runs the first-run coach marks again over your open project.
- Storage — open the project library in Finder or create a one-off backup zip.
- Copy Diagnostics — copies your version, setup, and support ID as a block to paste into a bug report. No project content.
- Version — the build you're running. Worth quoting in a bug report.
Export
- Format — PNG or JPEG.
- Custom filename suffix — append a suffix to exported screenshot filenames.
- Reveal in Finder after export — auto-reveal results in Finder.
- Export folder — choose or clear the folder Screenshot Bro reuses for ⌘E.
App Store Connect
- API key (Issuer ID, Key ID,
.p8file), Test Connection, and Demo mode. See the App Store Connect section.
Google Play
- Import a service account JSON key, test the connection, and toggle demo mode. See the Google Play section.
Automation
- Enable the local MCP server and copy the agent prompt, connection JSON, or access token. See the Automation & MCP section.
Purchase
- Current plan, restore purchases, manage subscription, and a copyable purchase ID to quote if you ever need help with a transaction.
Attributions
- Credits and licenses for fonts, icons, and bundled assets.
Free vs Pro
What's included and where Pro unlocks more.
Free tier
- 1 project — you can keep editing it forever.
- 3 rows per project.
- 5 templates per row.
- Full access to all device frames, shapes, languages, export resolutions, and store uploads.
- Watermark-free exports.
Pro
- Unlimited projects, rows, and templates.
- No row or screenshot-column limits when building larger launch sets.
- Future Pro-only features as they ship.
Buying or restoring
- Settings ▸ Purchase lists the available plans. RevenueCat handles the transaction.
- Restore Purchases brings back an existing purchase on a new Mac.
- Subscriptions are managed through your Apple Account; cancellations happen via System Settings ▸ Apple Account ▸ Subscriptions.
Pro paywall messages adapt to context — the prompt you see when adding a 4th row is different from the one you see when adding a 6th template, so you always know exactly which limit you're hitting.
Tips & Tricks
Small things that save time.
- Drop groups of screenshots together. Select several image files and drop them onto a row — Screenshot Bro fills templates in order and detects device category/frame where possible.
- Span backgrounds for storytelling. Turn on Stretch across all screenshots and use a wide gradient or panoramic image to make a 3-template carousel feel like one continuous scene.
- Lock aspect when resizing icons by holding ⇧ while dragging a corner handle.
- Duplicate while dragging with ⌥. Combined with snap, this is the fastest way to lay out a row of equal-sized cards.
- Type rotation degrees directly. The rotation field accepts text input — type
45for an exact 45° rotation instead of dragging. - Use the SVG button for icons. SVG scales infinitely, so your hero icon stays crisp at export size.
- Re-translate after editing base text. If you change the base headline, run Language ▸ Re-Translate All Text… (or use Translate Selected to All Languages in the language bar with the edited text selected) so every language picks up the new wording.
- Use Invisible category for clipped designs. When you want the screenshot to bleed off the canvas with no bezel, pick the Invisible device category.
- Star frequently used projects. Star Project — on the toolbar ⋯ menu, or by right-clicking a card on the Projects screen — floats it to the top of the picker.
- Preview before exporting. The Quick Look button on each template renders the row's screenshots and opens the preview at that template — handy for spot-checks.
- Repeat a shape across the row. Right-click ▸ Duplicate ▸ To All Screenshots drops a logo or footer onto every template at the same spot.
- Translate a repeated headline once. Right-click a text shape ▸ Reuse Translation links it to another string so they share one translation.
- Lock the background art. ⌘L on a full-bleed image stops you grabbing it every time you click near the canvas edge.
- Check the set, not just the screenshot. The pencil/eye switch in a row header shows the templates as a store-style carousel, which is how buyers will actually see them.
- Custom fonts persist. Imported fonts are bundled per project, so a project shared via iCloud or zip backup keeps its typography.
Keyboard Shortcuts
Mac keyboard shortcuts and canvas gestures.
File
⌘N | New project |
⌘E | Export screenshots |
Edit
⌘Z | Undo |
⌘⇧Z | Redo |
⌘C | Copy selected shapes, or focused text |
⌘X | Cut focused text |
⌘V | Paste shapes, images, SVGs, or focused text |
⌘A | Select all shapes in the active row, or focused text |
⌘D | Duplicate selected shapes / row |
⌘L | Lock or unlock selected shapes |
Delete | Delete selected shapes |
Esc | Deselect |
⌘⇧] | Bring shape to front |
⌘⇧[ | Send shape to back |
← → ↑ ↓ | Nudge selection by 1px |
⇧ + Arrow | Nudge selection by 10px |
⌥ + Drag | Duplicate while dragging |
⇧ + Drag rotation handle | Snap rotation to 15° steps |
⇧ + Drag resize handle | Lock aspect ratio |
View
⌘+ | Zoom in |
⌘− | Zoom out |
⌘0 | Reset to default zoom |
⌘⌥I | Show or hide the inspector |
F | Focus on selection |
Pinch / ⌘ + Scroll | Zoom canvas |
Middle-click + drag | Pan canvas |
Language
Language menu | Lists every language you've added, plus every translation action |
⌘] | Next language |
⌘[ | Previous language |
⌘⌥0 | Switch to base language |
Text editing
Double-click text | Enter inline edit mode |
Esc / click outside | Commit text edit |
Window
Window ▸ Show Main Window | Bring the editor back when its window is closed |
App
⌘, | Open Settings |
⌘? | Open Screenshot Bro Help |
Support & Feedback
We read every message.
The fastest way to get help is the Screenshot Bro Discord — questions, bug reports, and feature requests all land in front of the maker there, and you can see what is shipping next. Prefer email? Write to [email protected].
Reporting a bug
- Paste Settings ▸ General ▸ Copy Diagnostics into your message — it carries your version, setup, and the ID that lets us find your crash reports. No project content.
- Describe the steps that reproduce the problem, ideally with a screen recording.
- If the issue involves a specific project, attach a backup zip (Settings ▸ General ▸ Storage ▸ Create Backup…) — it makes fixes dramatically faster.
Privacy
- Your projects and screenshots stay on your Mac (and your iCloud, if you enable sync). See the privacy policy for details.
Enjoying Screenshot Bro? An App Store review genuinely helps a small app get discovered.